Get Your Desired Apps FREE!

Operating Systems

Get the best Operating system for you Pc.

Softwares

Get all the softwares you desire in one click

Secure Files

The files are all secure and virus/malware free so the user dosen't face any problems.

Easy Download

Download anything without the worry of Ads/surveys.

Ultimate Global Solution

The ultimate destination to all your software problems.

Sunday 1 May 2016

How to Protect Your Conversations from Spies (And Tools for Impenetrable Security)

How to Protect Your Conversations from Spies

 (And Tools for Impenetrable Security)

Do you think your nerd cave is under surveillance by spies? Are you secretly building a time machine and afraid that someone might steal your blueprints? Privacy is a priority for every tech lover. Today, there are entities out there who’re after your personal information – be it online marketers, hackers, or even government agents. Thanks to the Cybersecurity Information Sharing Act of 2015 – infamously dubbed as “CISA” – agencies like the NSA and FBI can freely monitor your online activities with the help of your ISP.

Why Does It Matter?

You may not be a super-villain secretly planning to take over the city (or the world). But you most likely have information you’d like to keep private. Your passwords, credit card information, browsing history, chats; nothing is safe without setting up the proper security measures. No, we’re not talking about using proxies, installing an antivirus, or going incognito. We’re talking about setting up an impenetrable, military-grade security.
Encryption holds the key to achieving this, and you’ll need a couple of tools to get started. First, let’s make sure all your online conversations are kept secret. There are currently two popular encryption methods being used: Pretty Good Privacy (PGP) and Elliptical Curve Cryptography (ECC).
PGP may not have a fancy name like ECC, but it’s worth mentioning that it’s been developing for over 25 years and it has never been cracked. PGP works with a pair of keys for each user – a public key for receiving and a private key for decrypting messages. On top of these, each message is encrypted with a “session key” that’s generated randomly every time. On the contrary, ECC is basically the newer version of public-key cryptography meant to replace the RSA (Rivest-Shamir-Adleman).

Using Encrypted Messages

Today, there is a growing number of secure messaging and email tools that utilize either ECC or PGP encryption. You can easily take advantage of PGP for emails with the following steps:
Step 1: Install a Desktop Email Client
The first thing you need to do is install a desktop email client. For the purpose of this guide, you should choose from either Mozilla Thunderbird (Free) or Postbox.
Step 2: Install GNU Privacy Guard
You will need GPG to generate your public and private encryption keys. You’re going to need GPGTools for OS X and GPG4Win for Windows.
Step 3: Install the Enigmail Extension
Enigmail is a security extension you need for your desktop email clients. Remember that you need the appropriate extension for Thunderbird and for Postbox.
Step 4: Configure PGP
Make sure to restart your mail client after installing Enigmail. When done, access the “OpenPGP” menu item and find “Key Management”. When setting up for the first time, you need to generate your keys by choosing “New Keypair”. Choose the email account you want to use PGP with and then assign a passphrase. When done, go ahead and click “Generate Key”.
Step 5: Setup a Failsafe
After Step 4, you will be asked to generate a revocation certificate. This can be used to devoid your public key should your private key get compromised. Also choose “Export Keys to File” from the
OpenPGP menu to create a backup of your keys.
Step 6: Encrypt Your Messages
You can now sign and encrypt messages from the OpenPGP menu. You can do this whenever you compose a new message. You will be asked for your passphrase each time. When done, you can
watch the magic happens as your message turns into an encrypted mess – super spy style!
Share:

Saturday 26 March 2016

Creating Folders With Different Colors


Creating Folders With Different Colors

Microsoft’s Windows operating system have completed almost 30 years of successful run, with more and more features and user friendly user interface being added one after another
However Windows users still lack few of the features which they think should be enabled with their Windows OS. One of which is, feature which can enabled is to add “colors to folders” or to add different colors to different folders in Windows run PC.
You may think what is the use of “adding colors to Folder in Windows”, well colored folders looks more attractive and are easier to navigate.
While Microsoft does not provide any option to change colors of the folders in windows. few softwares available online may help you change colors of the folder as of your choice.
Here, in this article I will explain you a similar method which will help you to add different colors to folder in your Windows run PC.
How to Customize folders with different colors in Windows?

  • First you need download this program. click on download icon.
  • And after download, Run the FolderColorizerSetup.exe file.
  • read the License Agreement and next go to I accept the agreement. And then click ‘Next’ if you agree.
  • If you agree, you'll be able to currently proceed with the installation, therefore click the ‘Install Now’ button.
  • When installing the program. Just be sure to uncheck the box for unwanted programs.
  • That’s it, installation is currently complete. you're able to add color to your desktop.
Creating Folders of Different Colors:
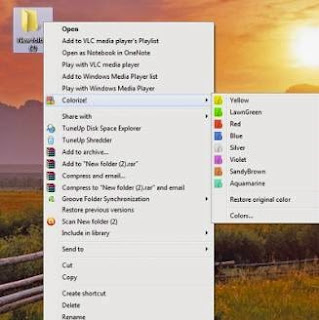
  1.   To start differentiating your folder, choose any folder icon you wish to vary the color of, right click on it, select ‘Colorize!’  so decide your color. It’s that easy.
  2. Once you have got Select a color for your folder, your folder icon color will change automatically from the standard yellow to the color you picked.
  3. Should you attempt to restore the initial color of your folder icon, right click on the folder, choose ‘Colorize!’ and pick ‘Restore original color’.
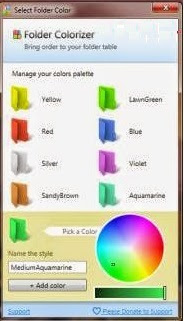
  4. But wait! There’s more! Folder Colorizer also provides a folder color manager which allows you to add and remove colors, moreover as making custom colours with the color wheel. If you need to use custom colors, right click again, select ‘Colorize!’ and select ‘Colors.

Share:

Saturday 12 March 2016

Internet Download Manager 6.25 build 12 Universal Full Crack With Serial Keys

Internet Download Manager 6.25 build 12 Universal Full Crack

With Serial Keys


Internet Download Manager 6.25 build 12 universal full crack and serial keys has now come up after its old version which has some more better features and bug fixes than its older versions like improved download engine and better recognition of video files in google chrome. Internet Download Manager fully activated has the ability to increase the download speed of your files because it uses a parallel download system which manages the download speed and files properly and provide maximum download speed. IDM 6.25 cracked is a very well known and famous download manager software all over the world and is the best source to download files in high speed. You can also download IDM 6.25 Build 3.

IDM 6.25 build 12 universal full crack also gives you the feature to set scheduled downloading by using which IDM will automatically start to download the files and it also recovers the broken and interrupted downloads in case of any lost connection or system failure. Internet Download Manger 6.25 build 12 full setup is not free to use software but by using the IDM crack file, you can activate the licensed version of IDM free of cost and it will work for life time. You can easily download IDM 6.25 build 12 crack and patch file from 

itsector101.blogspot.com

Internet Download Manager 6.25 build 12 Serial Keys

  • F9TZ9-P6IGF-SME74-2WP21
  • CJA0S-K6CO4-R4NPJ-EKNRK
  • N0Z90-KJTTW-7TZO4-I27A1
  • 629U7-XLT5H-6SCGJ-2CENZ
  • L67GT-CE6TR-DFT1D-XWVCM
  • XONF7-PMUOL-HU7P4-D1QQX
  • F9TZ9-P6IGF-SME74-2WP21
  • CJA0S-K6CO4-R4NPJ-EKNRK
  • N0Z90-KJTTW-7TZO4-I27A1

Download!


manual crack : Download! 
Universal Crack : Download!


Share:

Sunday 6 March 2016

Auto Shutdown USB

Auto Shutdown USB

Before you learn how to make an auto shutdown USB, it is important to know that this is just for educational purposes and can be considered illegal if used on certain private PCs. Therefore, I take no responsibility if you get in trouble with this. [Use with caution] The setup can be done with the help of writing a little bit of code in notepad and making a .bat file and a .inf file and putting these files in a USB drive. So, let’s begin.

How to Setup the USB

First of all, go find yourself a cheap old USB drive that you don’t use, because the USB stick we will be using will be dedicated for this purpose, and would automatically shutdown a PC when the PC turns on. Therefore, you won’t be able to use it for other tasks.
Now, open notepad and copy paste the following code:
[autorun]
open = launch.bat
Now, save the file as autorun.inf
It is important that you save the file with a .inf extension otherwise the file would run automatically when the USB is plugged in.
We have to make one more file in notepad that would actually tell the PC to shutdown. So, open notepad again, and type the following code:
c:\windows\system32\shutdown -s -f -t 20
Save the file as launch.bat
Here it is important that you save it as launch.bat because the previous file that we made auto runs and opens this file automatically will would run the showdown command.
-s is the command to shutdown the PC(If you want to restart the PC instead, replace -s with -r in the code.
-f command allows force shutdown
-t 20 means the computer would shutdown after 20 seconds.
(You can change it to any number of seconds, but I recommend not going below 20 seconds, because for example let’s say that you set the time to 2 seconds, then you won’t be able to edit these files in the future because whenever you would plug in the USB it would automatically shutdown the computer in 2 seconds and you would not have enough time to abort the shutdown procedure.)
Now, you have two files named as autorun.inf and launch.bat
Upload them to your USB drive and restart your computer to test. And, if everything was done right, your computer should shutdown in 20 seconds.

How to Abort Shutdown

1) Open Command Prompt by tying in cmd in the search bar.
2) Type shutdown -a to abort the shutdown process.

How to edit the files in future:

If you want to make changes in the 2 files that we made. You can simply right click on the file to open them with notepad and you can then easily change the code.

Have a little bit of fun with your Auto Shutdown USB

Plug your USB stick in the back of your friends desktop computer and leave it there and watch his reaction when he won’t be able to use his PC for more than 20 seconds. Whenever the computer is turned on, it would automatically shutdown. [Remember: Just for Fun!]
Share:

Thursday 25 February 2016

Hotspot Shield Elite Latest Version

Hotspot Shield Elite Latest Version Free Download


Hotspot Shield Elite provides data confidentiality and security of your computer when you connect to Wi-Fi access points, including the automatic encryption of all incoming and outgoing traffic. Software provides a virtual private network (VPN) between your laptop and a wireless access point. This impenetrable tunnel protects your e-mail messages and all data sent over the network, from access to spies and hackers. As a result, you will remain anonymous and protect your privacy.
Ensure you are private, secure, and anonymous online

  • Secure your web session, data, online shopping, and personal information online with HTTPS encryption.
  •  Protect yourself from identity theft online.
  • • Hide your IP address for your privacy online.
  • • Access all content privately without censorship; bypass firewalls.
  • • Protect yourself from snoopers at Wi-Fi hotspots, hotels, airports, corporate offices.
  • • Works on wireless and wired connections alike. Provides Unlimited Bandwidth.
  • • Works on the PC and the MAC, including new operating systems (Windows 7 and Snow Leopard)

Hotspot Shield is a software solution that adds a new security layer to your computer, as it has the necessary features to secure a wi-fi and a wired connection even in public places.
In just a few words, what Hotspot Shield does is to actually protect data transfers, so every bit you’ll send when connected to a certain network will be encrypted, no matter if we’re talking about private information, bank accounts or any other type of details.
Deploying the app is a bit annoying, since it attempts to install some other unnecessary software, but not as annoying as the program per se.
Although you’d be tempted to believe that advertisements won’t be displayed anymore since you’ve unchecked the installation of the other applications, you’re wrong. Hotspot Shield not only that attempts to block Google and take you onto another search engine, just for your personal security, but also displays advertisements in any browser, on any website.
Of course, the program remains very friendly with computer resources all the time, which means you should be able to run it on older machines as well, regardless of the Windows version.
In the end, Hotspot Shield seems a decent addition to your very own defense system, although some of the users might simply give up using it due to the advertisements displayed while browsing the web. Before jumping into conclusions, be sure to give it a shot. It’s free, so it won’t cost you anything.

Features of Hotspot Shield
  • · Secure your web session with HTTPS encryption.
  • · Hide your IP address for your privacy online.
  • · Access all content privately without censorship; bypass firewalls.
  • · Protect yourself from snoopers at Wi-Fi hotspots, hotels, airports, corporate offices and ISP hubs.
  • · Works on wireless and wired connections alike.
  • · Secure your data & personal information online.

SCREENSHOTS


Download Here!


Share:

Tuesday 23 February 2016

Blue Stacks 2 (Play Bigger)

Blue Stacks 2 (Play Bigger)

Over 10 Billion Apps are played worldwide. 
Blue Stacks is the biggest catalog of games on earth with billion of web and mobile titles all in one place.The android platform ha over 1.5 Million mobile apps.
Join over 130 million people using mobile apps on PC and Mac.

For the first time, you can play Castle Clash on a big screen and message on Whatsapp at the same time. You can also share files from your PC and Mac onto mobile, for example posting photos on Instagram from your computer.


Play Bigger, Play More, Play Everywhere, Play Instantly

Download apps onto to your computer with a single click. Bluestacks merges your Windows or OSX and Android experiences seemlessly. Applications and games can now live behind a single desktop icon.

Play BlueStacks

Play games and apps in one place with just one click – whether you have an Android smartphone or not. App Player is created by Bluestacks, inspired by you


Share:

Blue Stack Latest version Free Download

Blue Stacks


BlueStacks is the first production software that allows you to use your favorite mobile apps on a Windows PC. Android device simulator for Computer. Its used to even use Whatsapp on Computer. BlueStacks is innovative emulator that enables PC and Mac users (additionally even HDTV users who purchase special BlueStacks hardware) to enjoy Android video games directly on their monitor screens. This enables them to gain access to a sizeable library of award winning Android games on their desktop PC or laptop, without the need to offload any processing from the mobile device to their PC. All the emulation is done directly on PC, with customized control schemes that enable perfect control over Android software.You can install and use any android app on you PC with the help of blue stacks.

How to Install?

1- Download the file from the link.
2- Open the file and install the program on your PC
3- Run the program.
Enjoy Android On your PC.

Share:

infolinks